How to Make Paracord Bracelet: Simple, Elegant And Surprisingly Useful
A paracord bracelet is one of those rather obscure yet surprisingly useful accessories that we tend to take for granted. Knowing how to find and buy one is simple, yet knowing how to make paracord bracelet by yourself is something different all together. It can be surprisingly rewarding and a rather nice relaxing hobby to have, especially while at a campsite with nothing much to do.
[the_ad_group id=”21″]
This craft is not a complicated one by any means, even though it might seem like it at first glance. Truth be told, the only thing that you will have to worry about is deciding whether you want to make a paracord bracelet with a buckle or a paracord bracelet without a buckle.
Don’t worry though, there are still a lot of variations and a lot of neat things that you can do in order to keep this occupation fun and interesting for quite a bit of time.
How to Make Paracord Bracelets The Easy Way
Below I describe the basic way of making paracord bracelets, without using a lot of colors or extras.
You can check video instructions in YouTube video here:
First and foremost you will need to stock up on supplies. You will need the following:
- 1 length of paracord, usually 2-3 times the length of your forearm.
- 1 lighter
- 1 pair of scissors
- (optional) plastic / metal buckle
You don’t need anything else to create a simple bracelet but there are a lot of things that you can add to the bracelet later along the line or even after the bracelet is completed.
See also: Paracord Watch Band: How to Make and How to Use One
Another small note that can be made here is that you should always buy a slightly larger quantity of paracord; usually a few inches longer than the recommended length. This is because it is better to have a bit extra left over than to run out of cord and be stuck with an incomplete or rushed bracelet.
After you’ve bought your supplies, it is time to make the bracelet itself so follow the steps below:
- Start off by finding the middle of the length of cord and marking it with a piece of string or a small ribbon. That will be your middle mark for the bracelet, as well as where the actual weaving will end.
- After you’ve done that, fold the paracord in 2 at the middle mark and wrap it around your wrist once. Measure and mark the wrapped cord because this will be the actual base of the bracelet. This is where you will start weaving and where you determine the actual size, complexity and pattern of the bracelet itself.
This is also where things start to differ depending on whether or not you chose to go with a buckle.
Bracelet with a buckle
If you chose to go with a buckle, then things will be a lot easier.
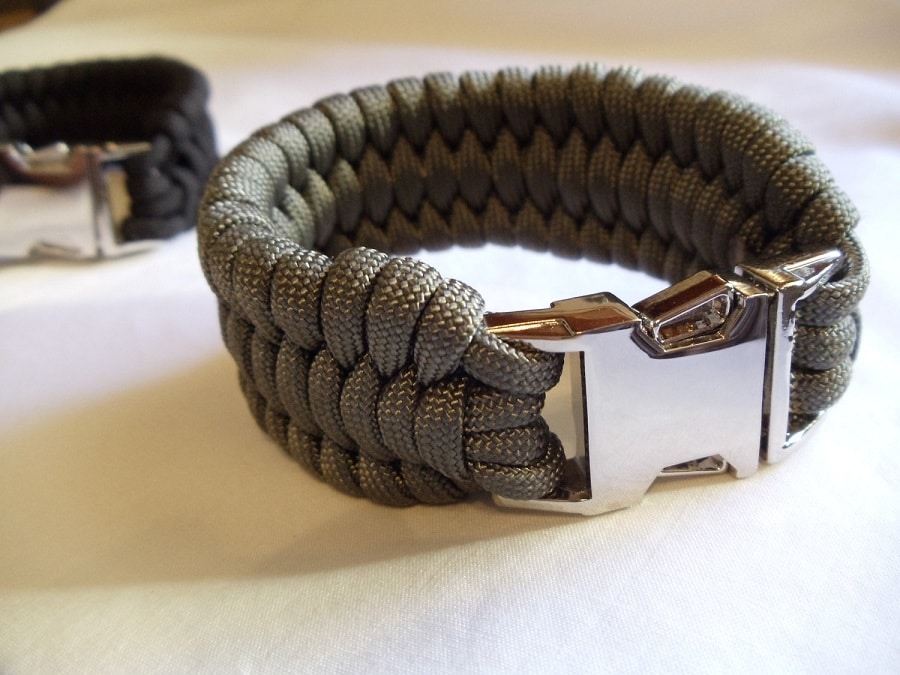
Here are the steps:
- First of all, slide the “father” half of the buckle onto the cord until it reaches the middle mark. Once it is positioned above the middle mark properly, fasten it in place by tying nods at each end.
- Grab the “mother” half of the buckle and slide the ends on the cord on each side until the buckle reaches the point that you have measured when you wrapped it around your wrist.
It is important to mention here that you can add a bit of slack or make it a little tighter, depending on your preferences. Although it is generally preferred that these bracelets have a bit of slack to them for a more comfortable feel as well as some minor utilitarian uses.
Bracelet without a buckle
If you chose to make the bracelet without a buckle, you will have to put in a bit of extra effort. Because you will not be using a buckle, what you can do is get a bit creative, grab a screw and tie the middle mark to it.
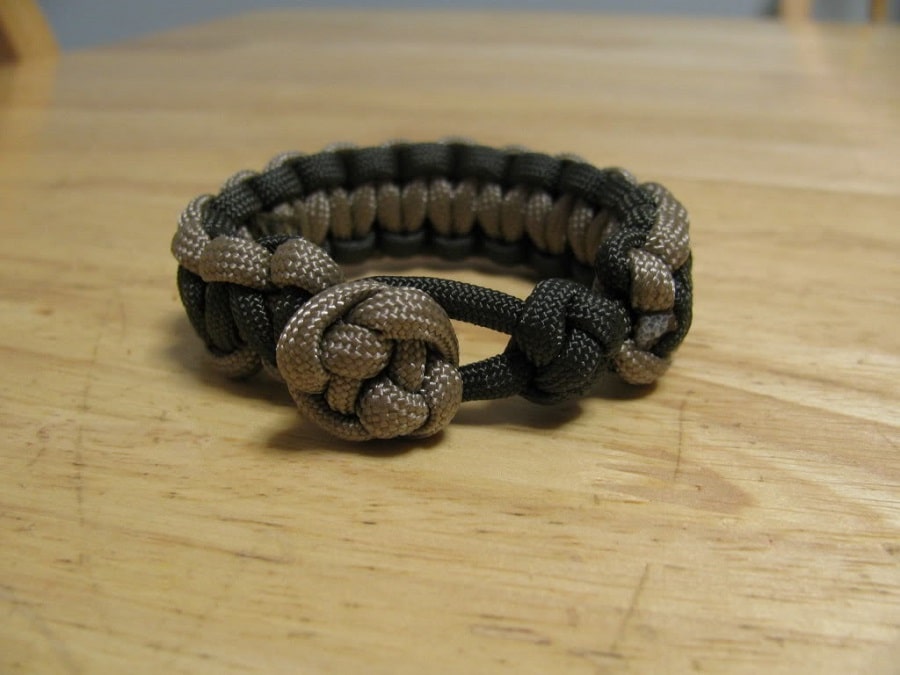
Maybe even wrap it around the screw once for good measure before tying up the knot. This will create a small loop which can actually act like a “mother” half of a buckle.
- Now, wrap the cord around the wrist, and the point in which the cord meets the knot under the middle mark. Tie the 2 pieces of cord together in place with a double knot.
- Continue tying and increasing the knot further and further until the knot can barely go through the loop at the middle mark. This way it essentially becomes a “father” half of a buckle and together with the other end, the loop over the middle mark, you essentially have a makeshift integrated paracord buckle for your bracelet.
Weaving the bracelet
Now comes the fun part, and at the same time the most customizable part of the bracelet: weaving.
So what you have now, buckle or not, is the main base body of the bracelet; 2 strands of paracord that are joined together at the ends. However, the rest of the paracord is still attached to the base body, so you can use it to weave the bracelet together.
The truck and tire tread
The most popular weave, also known as the “truck tire tread”, is also the simplest one that you can pull off. Simply take one strand of excess paracord and tie it using a simple knot to the strand on the opposing side of the main body of the bracelet.
Make sure that the knots are nice and tight and that the strands themselves are properly packed together. This will give more sturdiness to the bracelet and stop the weave from slacking or looking uneven.
Do the same, alternating between strands, adjusting the knots and applying increasing pressure on the weave as you go.
[the_ad_group id=”22″]
For extra ease of weaving, you could actually suspend the base body of the bracelet from a screw, keeping it taut and stiff throughout the weaving process. This essentially frees up your grip on the main body of the bracelet, allowing you to weave the paracord faster and more comfortable. It also gives you the extra range of motion to take on more challenging weaves.
The cornrow weave
Another very popular weave is the traditional “cornrow weave”, however this one requires a bit of prep beforehand. Essentially you would want to double back to when tying the knot at the measured point and actually go one over, tying an extra strand of paracord parallel to the original 2 strands that made up the base body.
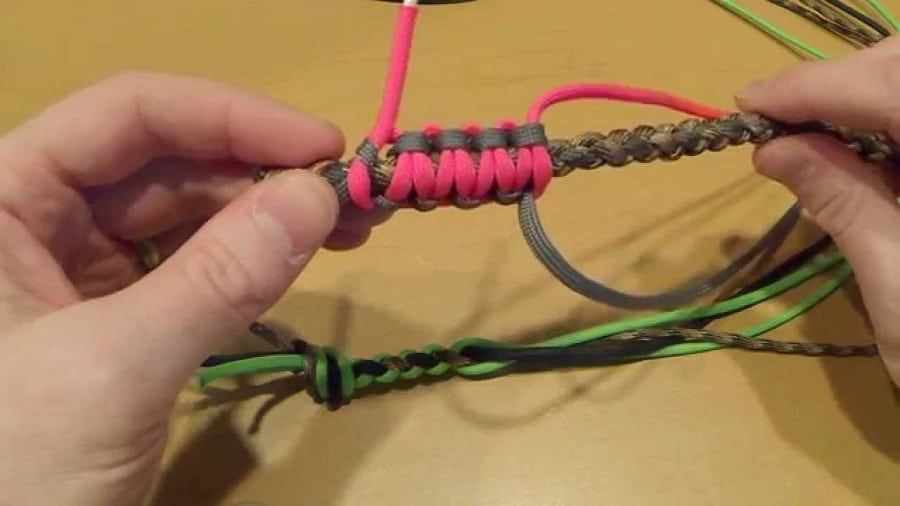
Once that is over and done with, grab the excess paracord and start weaving it together. Start at the top right one and slide the first bit until the middle strand, then grab the other excess strand, at the upper left corner and slide it over the middle strand, overlapping the previous slide.
Continue alternating between strands while advancing down the bracelet.
One very important thing to mention about this weave is that it is a bit stiffer than the “truck tire tread” weave, and a bit more resilient. However, it is a lot less bulky and a lot less impressive. It does go very well with a more sleek and streamlined camping and hunting outfit.
The double upper-double downer
A more interesting, all be it less popular, weave that you can try out on your bracelet is the “double upper-double downer” weave. This is another weave that uses 3 strands of paracord in the base body but a bit more interesting to execute.
Instead of sliding the strands of excess paracord over the middle one, you will actually be tying them to it using small simple knots. Make sure that the knots and strands are properly tightened and packed in order to hold a stable and harmonious pattern.
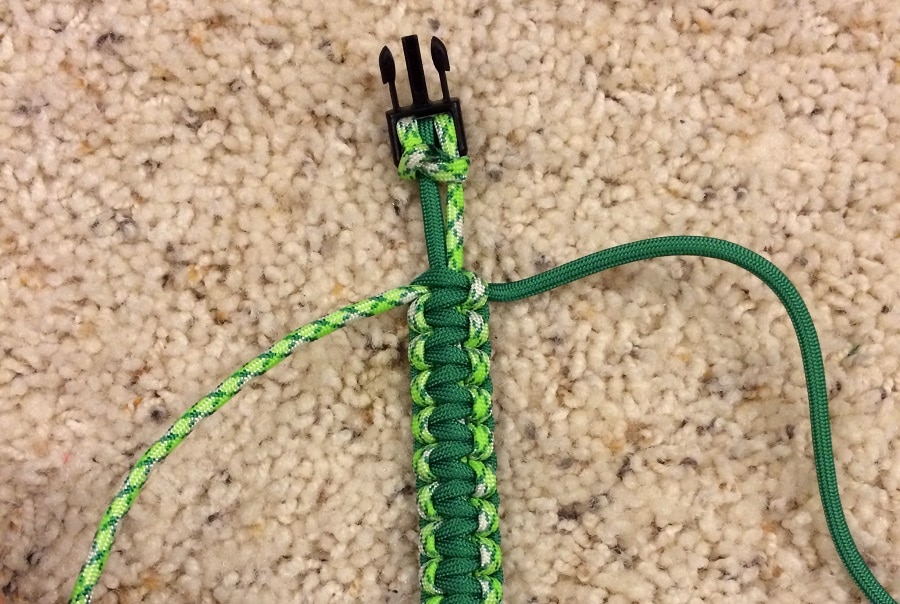
Tie the first middle knot with the left strand and the second one with the right strand. Double them over, and the fifth and sixth knots you will actually tie to the opposing side of the base body, sliding the strands of excess paracord either over or under the middle one.
This pattern repeats itself throughout the length of the bracelet, giving off the illusion of more or less an uneven basket weave, exposing the middle base body strand every 2 weaves for 2 weaves.
Once you are finished, simply tie off the strands, cut the excess strands of paracord off with a pair of scissors, and burn the remaining excess paracord off with the lighter. You can also shape and mold the final knot a little in order to make it blend into the bracelet or hide it under one of the buckle halves.
There are a lot of other weaves and weave ideas floating around for these bracelets. If you feel daring and talented enough, you can also try out your own weaves and even experiment with weaves until you find one that you like and feel that it suits your style.
How to Make A Bracelet – Advanced Tutorial
This is a more advanced way of going about making a bracelet. These types of weaves and bracelets can also be used in tactical and even survival purposes. Paracord itself is strong enough to bare loads that far exceed the capabilities of other such materials, and with the added resilience and endurance that it gets as a result of weaving, it can be used as a rather handy secondary belt, right at your wrists. For a detailed tutorial on how to make a paracord survival belt, see our earlier article that contains this topic.
You can attach small portable bits of gear like flashlights, small radio receivers, a compass, and so on. If it is small enough to fit, light enough to not bother you and handy enough to be needed on a regular basis, you can attach them to the bracelet and always have them on hand if need be.
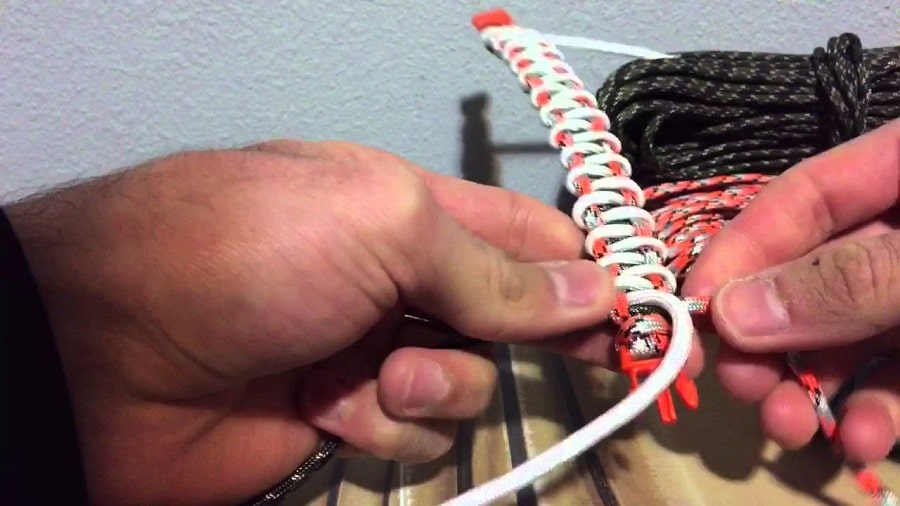
The process is vastly similar with what we already discuss as the basic steps are the same. However, this time there is a plan in place beforehand.
The first thing that is different here is the buckle. The idea of not having a buckle is no longer off the table, and instead of flimsy plastic buckles you will be looking at more robust ones, even metal if need be. This is to add a bit more tensile strength to the bracelet.
The second thing that you will have to do differently is the weave. You will have to choose your patterns carefully in order to not make them too bulky. Alternatively, you could also do skip-weaves, where you actually skip certain sections of the weaves and create patterns that at first glance might seem incomplete. This creates just enough space to actually fit the accessories and tools that you want to attach.
Besides tactical and survival uses, you could also get into more detail with your bracelet. For instance:
- Using a threading needle, you could actually weave thin strands of colored yarn or string through the weaves in order to give them special effects or accentuate the patterns.
- Lightning effects, shadows, bloom effects, even simple blocky graphics can be achieved easily by threading the thin colored string through the thick weaves.
- If anything, you could add a whole new layer of customization to your bracelet.
- You could also thread some phosphorescent wires through the weaves and use the bracelet as a small beacon in order to be spotted easily in the dark if need be.
Another thing you could do is to make multicolored patterns, using different colored paracord strands. This is a bit trickier and it actually requires you to build the actual bracelet in 2 parts.
First and foremost, the base body of the bracelet will be of a single solid color, usually a dark color. After the base body is completed, tie it up, cut the excess with a pair of scissors and burn the excess away as you would with a simple build. This time, grab different colored lengths of paracord and start weaving them.
[the_ad_group id=”23″]
You can tie them with small simple knots at the ends of the bracelet and seal them like you did with the base body in order to make sure that they will stand in place.
You can play around with colors and patterns as much as you want, and considering that these bracelets can hold a maximum of 4 colors, the possibilities are nearly endless.
And in the above video you can check How to Make the “Advanced Solomon” Paracord Survival Bracelet.
A Few Final Words On Paracord Bracelets
As you can see, it does not take a lot of effort, or a lot of time for that matter, to make your own bracelet out of paracord. It is actually a popular hobby, especially among hunters, survivalists and nature enthusiasts. These are the people who also come up with a lot of uses and ways in which you can modify these bracelets in order to suit your survival needs.
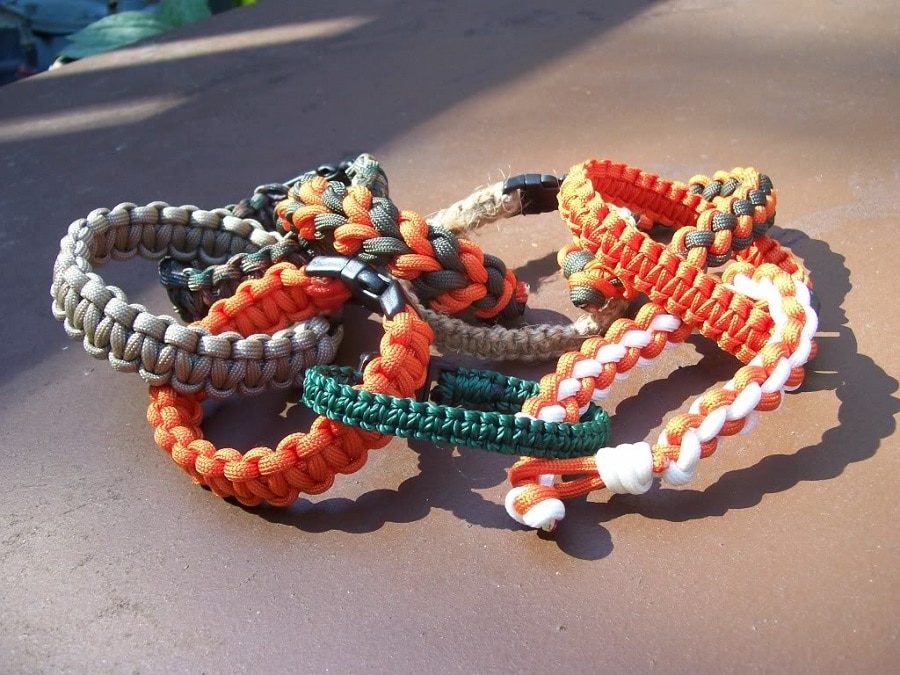
That being said, considering all the reasons that you have at your disposal in order to wear them, combined with the fact that they are virtually inexpensive and incredibly easy to make and repair if need be, as well as easy to recycle and reuse under a different form for a different use, these bracelets will undoubtedly be quite the addition to both your wardrobe and your skill set.
In the end, we hoped you learned how to make a paracord bracelet from our tutorials. Also, if you know other techniques and weaves (and I’m sure you do), don’t hesitate to let us know in the comments section.
For more ideas on paracord uses, see our article on this crafty topic.




Referred in this article node called “cobra stitch”. This way you can do, for example, a collar for your dog or cat. If you often go hiking or are addicted to climbing, this bracelet is beautifully placed on your wrist as a reflection of the extreme nature and lifestyle. Also, remember that your hand has almost two meters of strong rope, which can be useful in emergency situations, when the hand is nothing. And that’s the most important thing about such bracelets.
Paracord is a wonderful material with almost limitless usability. I actually want to thank whoever thought of turning paracords into neat and fashionable bracelets because this made the paracord not only compact, but stylish as well.
I was really impressed with these bracelets. The most interesting thing, of course, not beauty, but functionality. The main value for the survivors like we is presented in its contents in unwound condition, the length of strong rope on average ranges from 3 to 5 meters. In severe conditions, such a gift can play an important role and given it’s dual functionality – a simply irreplaceable thing in your go bag. Must have!
These bracelets are durable, highly functional, and they can be a great fashion accessory. I really think this should be a backpacker or a camper’s staple accessory because it’s not just a bracelet, it is a bracelet with a purpose.